2 May 2014
Conor's Sections of the Animation
Unicorn Section
Tech Section
Sunrise Section
Candle Section
Horse2 Section
Horse Section
Cell Section
Butterfly Section
Atom Movement Section
Atom Dance Section
Circuit City Section
My personal contributions
Jess Richardson -
Below are my personal contributions to the project which I have posted here for the sake of the marker being able to identify which sections were created by who.
Jess
Below are my personal contributions to the project which I have posted here for the sake of the marker being able to identify which sections were created by who.
Jess
27 March 2014
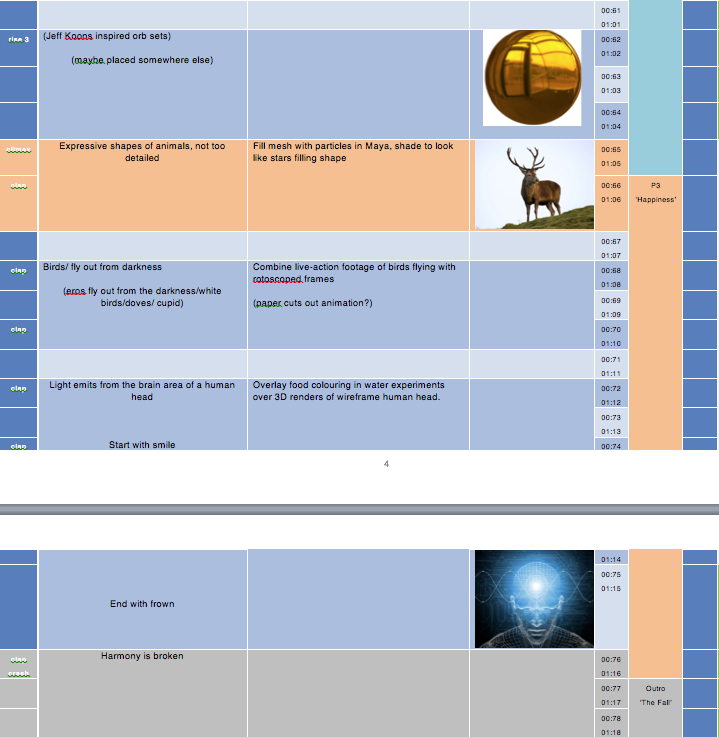
Reindeer Test
This is my first test at filling the reindeer mesh I created with particles, the aim is to create the suggestion that the reindeer is being created from stars.
I tried several different approaches before deciding on a set-up, my intention was to have the particles fill the mesh and fly around, rather than filling the mesh solidly and being stuck together. I also wanted the particles to fill smaller areas of the mesh such as the antlers for clarity. Using a simple emitter set to a high Rate Per Second meant that the mesh file with particles that were packed very tightly, although this eventually filled some of the more detailed areas the particles were too static and there were too many of them, making the simulation very slow.
In order to achieve the final result I decide to use separate curves to outline some of the main areas of the reindeer mesh. I then assigned particles emitters to the curves, meaning that the particles would emit from each vertex in the curve. I was also able to manipulate the number of points in each curve by using the 'Rebuild Curve' tool, meaning that I could have the particles emit from even areas of each curve. I then experimented with several different rates of emission in order to gain a look I was happy with and have the particles fill the mesh at an appropriate rate. One of the main elements that helped achieve this was changing the emission type from Live Forever to Constant.

In order to achieve the effect in which the particles fly around the mesh I added a Turbulence and a Vortex field. In the render above I also changed the particle type to Streak and manipulated the shading. For lighting I simply used a HDR image to produce the test.
I was quite happy with the outcome of this and so will work on adding a small amount of animation to the reindeer mesh, I may also add some other background elements to create interest. I also need to add another particle simulation that will help create the illusion that the particles are gathering together to form the deer. This could however be created separately and composited with the reindeer render.

14 January 2014


9 January 2014
2 January 2014
Filling Mesh with Fluid
In the following examples I have been experimenting with filling the character I created previously with a fluid in Maya.
In order to achieve this effect I have used a 3D fluid container and started with the fish tank preset, by manipulating the attributes of the fluid I was able to make the fluid rise to the top of its container. The container is placed around the outside of the character and the characters mesh is selected and assigned as a collision object with the fluid.
The outcome of this was that although the fluid filled the mesh there were also large amounts of fluid around the outside of the character. On this occasion I was unable to fix this and I did like the effect that this had in part, aside from the blocky nature of the fluid because it adheres to the shape of the container. I will therefore look for other techniques of filling meshes with fluids.
Another way to approach this would be to have the fluid assigned to 'Fill Object' in the attribute editor, this will result in the fluid originating from the centre of the character mesh. I will try this approach next.
I am also aware that another approach would be to use particles to fill the mesh instead these can also be converted to a mesh that can be textured, but the physics of the water may not be overly effective.


Having achieved a look I was fairly happy with I did a test render of the scene to see what the final look would be. I quite liked the effect that the fluid had as it appeared to burst from the lens of the character and the result of the reflection of the animated image sequence in the fluid, I therefore decided to experiment with having this appear to seep into the rest of the fluid by combining the test renders with the video footage from the experiment.
I used several duplicates with varied blending of the footage which I masked and animated in After Effects to produce a rough test towards the end of the video below.
The next step will be to use a similar technique to combine the characters mesh filling up with with the cornstarch / displacement map experiments, this will involve attempting to match the shading of the liquid that fills the character with that of the displacement animation, this is something I will experiment with at a later date.
Post by Jess
1 January 2014

11 December 2013
Further Testing of Oil Footage as Animated Texture on Model
Expanding upon my last post I have done some further testing of image sequences on the lens headed character. In the following video I have added an image of a lens to the image sequence before exporting from After Effects, using this process will mean that we can use After Effects to create any sort of footage that can then be exported as an image sequence and applied as a texture within Maya.
I also wanted to experiment with the reflectivity of the glass in the characters face, here I have moved an image plane with a Surface Shader applied to it around the scene to test the reflections. I like the effect that this has and think this technique could be used to emphasise particular areas of the animation.
Subscribe to:
Posts (Atom)